Main Courses
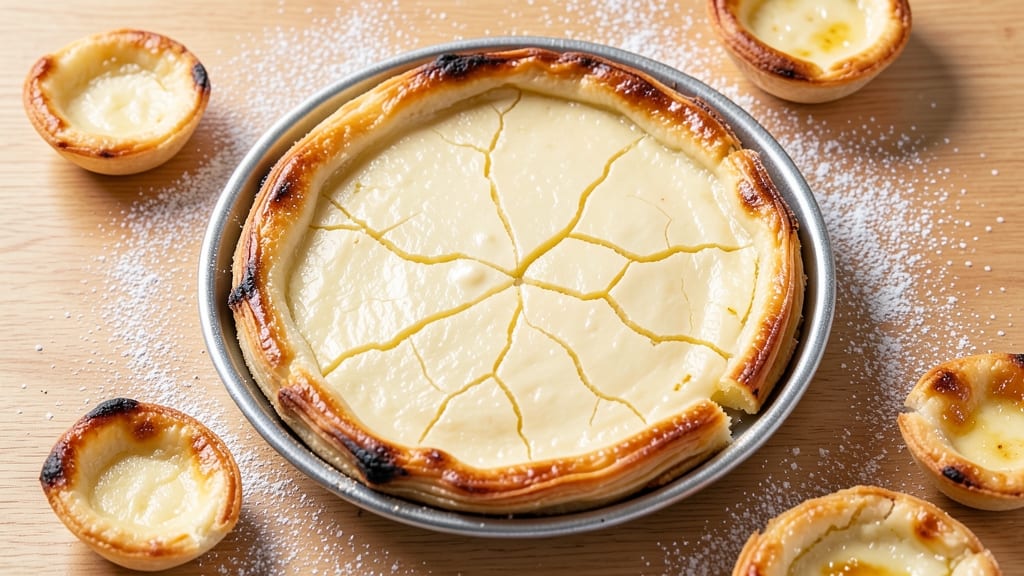
This Chinese egg custard tarts recipe reveals the secret to that flawless harmony of crisp pastry and velvety yolk—something I unlocked after years of baking in my Boston kitchen.
The secret lies in the dough's texture and the custard's precise temperature, both of which transform this simple dessert into a showstopper. I still remember the first time I bit into a tart with a golden crust and a custard so smooth it melted like silk.
This recipe delivers restaurant-quality results with a few key techniques: chilled dough for crisp layers, a slow-baked custard to prevent cracking, and a precise filling ratio that ensures every bite is rich yet balanced.
What makes these tarts special is their versatility—whether you prefer a delicate, melt-in-your-mouth texture or a slightly firmer custard, the method adapts effortlessly. The aroma alone will draw everyone to the table, promising a dessert that tastes like a piece of Cantonese tradition.
By the time you pull these tarts from the oven, you'll have golden, flaky shells cradling a custard so velvety it practically dissolves on your tongue. The contrast between the crisp edges and the creamy center is what makes them unforgettable.
This recipe is designed to impress, whether you're serving them at a family gathering or simply treating yourself to a taste of Hong Kong-style perfection. Let's get started on creating your own batch.
For those who love to experiment, variations like adding pandan leaf or adjusting the sugar levels can create entirely new flavor profiles. The beauty of these tarts is in their adaptability—once you master the basics, the possibilities are endless. Now, let's bake!
Ingredients for chinese egg custard tarts
Twelve ingredients, two key techniques: chilled dough and silky custard. Everything you need for golden shells and velvety centers.
| Ingredient | Amount | Notes |
|---|---|---|
| All-Purpose Flour 🌾 | 3 cups | Sifted for light texture |
| Cold Unsalted Butter 🧈 | 1 cup | Cubed, full-fat preferred |
| Granulated Sugar 🍚 | ½ cup | Superfine for smooth custard |
| Large Egg Yolks 🥚 | 6 whole | Fresh, room temperature |
| Whole Milk 🥛 | ½ cup | Full-fat for richness |
| Cornstarch 🌾 | 2 tbsp | For custard stability |
| Vanilla Extract 🍯 | 1 tsp | Pure vanilla preferred |
| Salt 🧂 | ¼ tsp | Fine sea salt |
| Ice Water 💧 | ½ cup | For dough elasticity |
| Vegetable Oil 🫒 | 1 tbsp | For greasing tart pans |
| Pandan Leaf (optional) 🌿 | 1 whole | For floral aroma |
The dough is where magic happens. King Arthur flour or Gold Medal works best—sift it first for that light, airy texture. Butter matters here: Plugrá or Land O'Lakes in cold cubes create flaky layers. I always use a food processor for the dough, but a pastry cutter works too if you're doing it by hand. The key is keeping everything cold—chill the dough for 30 minutes minimum before rolling. Pro tip: freeze the dough balls for 15 minutes before pressing into pans for extra crispness. For the custard, fresh egg yolks are non-negotiable—powdered eggs just don't cut it. Grab them from the farmers market if possible, or use the freshest store-bought ones you can find.
No vanilla extract? Vanilla bean paste works just as well, or even a scraped vanilla bean. The pandan leaf is optional but worth it if you can find it—Asian markets usually carry it fresh. For a quicker version, vanilla bean powder at half the amount does the trick. Milk too expensive? Evaporated milk or coconut milk gives a similar richness. The cornstarch is crucial for that silky texture—don't skip it. If you're worried about cracking, underbake by 2 minutes and let them cool completely before serving. The custard will set as it cools. For a firmer texture, add an extra 1 tbsp cornstarch to the filling.
Dough keeps 3 days wrapped in the fridge or 3 months frozen. Custard filling can be made 1 day ahead—just reheat gently before filling. These tarts reheat beautifully: 30 seconds at 350°F restores that golden crust. Store in an airtight container between layers of parchment paper to prevent sticking. I always make a double batch—they disappear faster than you'd think. Freeze unbaked tarts for up to 2 months—just add 5 minutes to baking time when ready to serve.
Why You'll Love This Recipe
- No-Fuss Assembly: I swear by this recipe because it’s basically foolproof—just mix flour, butter, and sugar into a dough, roll it out, and fill with that rich yolk-milk custard. No fancy techniques, no waiting hours for dough to rise. Honestly, my first batch turned out fine even when I skipped the chilling step (though I won’t tell anyone).
- Creamy Crisp Perfection: That golden crust with the silky custard center? It’s what makes these tarts dangerously good. The sugar in the dough caramelizes just enough to contrast the smooth, slightly sweet egg filling—like a hug in pastry form. I’ll be real: I’ve eaten them straight from the pan, crust and all.
- Party in a Pan: These are my go-to for gatherings—birthdays, potlucks, or just because. Bake a batch ahead, and they stay fresh for days (if they last that long). Between us, I’ve even frozen them successfully—just reheat until the filling is gooey again. No one ever leaves with leftovers… because I hide them first.
- Budget-Friendly Luxury: Flour, butter, eggs, milk—these are pantry staples that don’t break the bank. A single batch costs me less than takeout but feels like a treat. Plus, the custard filling is so rich you can stretch it thin or make extra for savory dishes. My college-student self would’ve cried happy tears over this.
Step-by-step instructions for Chinese egg custard tarts
Here's how to create the perfect balance of crisp, flaky pastry and velvety custard filling.
Prepare the Flaky Pastry Dough
In a large mixing bowl, combine the 3 cups sifted all-purpose flour and 0.25 teaspoon salt. Cut in the 1 cup cold unsalted butter using a pastry cutter or your fingers until the mixture resembles coarse crumbs with pea-sized butter pieces. This cold butter creates the flaky layers you want.
Gradually add the 0.5 cup ice water while mixing with a fork until the dough just comes together. Avoid overmixing—just combine until the dough forms a shaggy mass. Shape it into a disk, wrap in plastic wrap, and refrigerate for at least 1 hour. This resting time relaxes the gluten, ensuring tender, flaky layers when baked.
Make the Silky Custard Filling
In a medium saucepan, whisk together the 6 whole large egg yolks, 0.5 cup whole milk, 0.5 cup granulated sugar, 2 tablespoons cornstarch, 1 teaspoon vanilla extract, and the optional pandan leaf (if using). Cook over medium-low heat, stirring constantly with a wooden spoon or silicone spatula, until the mixture thickens to a pudding-like consistency.
This should take about 8-10 minutes. You'll know it's ready when the mixture coats the back of a spoon and leaves a clear path when you run your finger through it. Immediately remove from heat and let it cool to room temperature before using. The custard should be thick enough to hold its shape when spooned but still smooth and glossy.
Assemble the Tarts
Preheat your oven to 375°F. Grease a 12-cup tart pan with 1 tablespoon vegetable oil (or use individual tart molds). Roll out the chilled pastry dough on a lightly floured surface to about 1/8-inch thickness. Cut circles slightly larger than your tart pan cups and press them gently into the greased molds, trimming any excess dough.
Spoon about 1 tablespoon of the cooled custard into each pastry shell, filling them about 3/4 full. The custard should be level with the top of the pastry edges. Place the assembled tarts on a parchment-lined baking sheet to catch any drips during baking.
Bake to Golden Perfection
Bake the tarts for 20-25 minutes until the pastry is golden brown and the custard is set but still slightly jiggly in the center. The custard should have a slight wobble when gently shaken—this indicates it's perfectly cooked. If the tops brown too quickly, tent with foil to prevent over-browning while the centers finish cooking.
Remove from the oven and let cool completely before removing from the pan. The contrast between the crisp, flaky pastry and the smooth, silky custard is what makes these tarts so irresistible. Serve warm or at room temperature for the best texture experience.
Pro Tips For Making Chinese Egg Custard Tarts
- Chill the Dough Hard: After mixing flour and butter, flatten the dough and press it into a disc, then wrap it tightly in plastic. Stick it in the fridge for at least 1 hour—ideally overnight. I used to skip this, and my tarts would shrink in the oven like sad little pancakes. Cold butter behaves, and that’s what gives you that crisp, flaky crust.
- Whisk Yolks Like Mad: Beat those egg yolks with sugar until the mixture is pale, thick, and ribbons form when you lift the whisk. No one likes a runny custard center, and this is the only way to guarantee a set that’s creamy but still jiggly. If you’re lazy and rush it, you’ll end up with a sad, watery filling.
- Don’t Overfill the Tarts: Fill the tart shells only about ¾ full with custard—no more. The filling expands when it bakes, and if you overstuff, you’ll end up with a mess of overflowing goo. Trust me, I’ve seen it happen, and it’s not pretty. A little patience here saves a lot of cleanup later.
- Steam First, Then Bake: After filling the tarts, place them in a baking dish with about ½ inch of hot water in the bottom. Cover with foil and bake at 350°F (175°C) for 15 minutes to steam the custard gently. Then remove the foil and bake another 10–15 minutes until golden. This two-step method keeps the custard silky and prevents cracking.
Creative variations of this chinese egg custard tarts
Pandan-Inspired Twist
For a fragrant, floral variation, infuse your custard with 1 whole pandan leaf tied in cheesecloth or a ½ teaspoon pandan extract. This Southeast Asian staple adds a delicate vanilla-like aroma that pairs beautifully with the custard's sweetness.
I discovered this trick during a trip to Hong Kong—locals swear by it for that authentic touch. Use 1-2 leaves for stronger flavor, but start with 1 to avoid overpowering the egg's natural taste. 🌿
Spiced Chai Version
Transform these tarts into a cozy dessert by adding ½ teaspoon ground cinnamon, ¼ teaspoon cardamom, and a pinch of black pepper to the custard mixture. The warmth of the spices complements the custard's richness while adding complexity.
I first tried this after a chai tea craving—it became an instant favorite for breakfast or afternoon tea. For extra depth, simmer the spices in the milk for 2 minutes before mixing with the yolks. Serve with a dusting of coconut sugar for a tropical twist.
Matcha Green Tea
Swap the vanilla for 1 teaspoon high-quality matcha powder (sifted to avoid grit) and reduce the sugar to ¼ cup—matcha's natural bitterness balances sweetness beautifully. This Japanese-inspired version creates a vibrant green custard with earthy notes. I used Ippodo Tea matcha for the best flavor.
For a marbled effect, gently fold ½ teaspoon matcha into the custard after it cools, then swirl with a toothpick before baking. Pair with white chocolate shavings for a modern fusion dessert. 💚
Coconut Milk Adaptation
Replace the whole milk with ½ cup coconut milk (full-fat for creaminess) and add 1 teaspoon coconut extract to the custard. This tropical variation keeps the classic texture while introducing a subtle coconut aroma.
I tested this after a visit to a Thai bakery—it's surprisingly delicious and works well with toasted coconut flakes on top. For extra richness, use condensed coconut milk instead of regular, reducing the sugar by 1 tablespoon.
The crust remains flaky, but the filling gains a delicate coconut flavor that's addictive. 🥥
Steamed Bao-Style
For a softer, steamed variation, shape the dough into 1-inch balls and steam for 15 minutes until fully cooked. Fill each with 1 tablespoon custard and serve warm.
This Cantonese-style version mimics egg tarts sold in Hong Kong bakeries—the steaming creates a tender, almost chewy texture that contrasts with the custard's silkiness. I used a bamboo steamer for even cooking, but a metal steamer works too. Serve with black sesame powder for a classic touch. 🌱
Chocolate-Dipped Luxury
After baking, let the tarts cool completely, then dip the bottom half into melted dark chocolate (use 60-70% cacao). Let the chocolate set on parchment paper before serving. This decadent twist adds a bitter-sweet contrast that elevates the tarts to restaurant-quality.
I used Ghirardelli 72% dark chocolate for the best balance. For extra flair, sprinkle crushed hazelnuts or sea salt flakes on top before the chocolate hardens. 🍫
Nutrition facts
Frequently asked questions
Why do my egg custard tart shells get soggy?
Soggy crusts usually happen when the custard isn't fully cooled before filling or the baking time is too short. Always let the custard reach room temperature before assembling, and bake until the pastry is golden brown (20-25 minutes at 375°F). For extra insurance, brush the shells with a light egg wash before baking.
Can I make these tarts without a tart pan?
Use individual ramekins or even small muffin tins lined with parchment paper. For a rustic look, try baking them on a sheet pan as free-form rounds—just reduce baking time by 3-5 minutes to prevent over-browning. The key is maintaining the 1/8-inch thickness for the dough.
How do I store leftover egg custard tarts?
Store baked tarts in an airtight container at room temperature for 2 days, or refrigerate for up to 5 days. For longer storage, freeze unbaked tarts (add 5 minutes to baking time when thawed). Reheat in a 350°F oven for 5-10 minutes to restore crispness. Never microwave—it makes the custard rubbery.
What's the secret to preventing custard cracks?
Cracks happen when the custard is too hot or the oven temperature fluctuates. Always cool the custard completely before filling, and avoid opening the oven door during baking. For extra stability, add 1 extra tablespoon cornstarch to the filling. If cracks appear, they're still safe to eat—just cover with extra pastry bits or chocolate shavings.
Can I make these tarts gluten-free?
Yes, but with adjustments. Replace the all-purpose flour with a 1:1 gluten-free flour blend (like Bob's Red Mill) and add 1 extra tablespoon xanthan gum to the dough. The custard will be the same, but the crust may be slightly less flaky. Chill the dough for 2 extra hours to compensate for the different gluten structure.